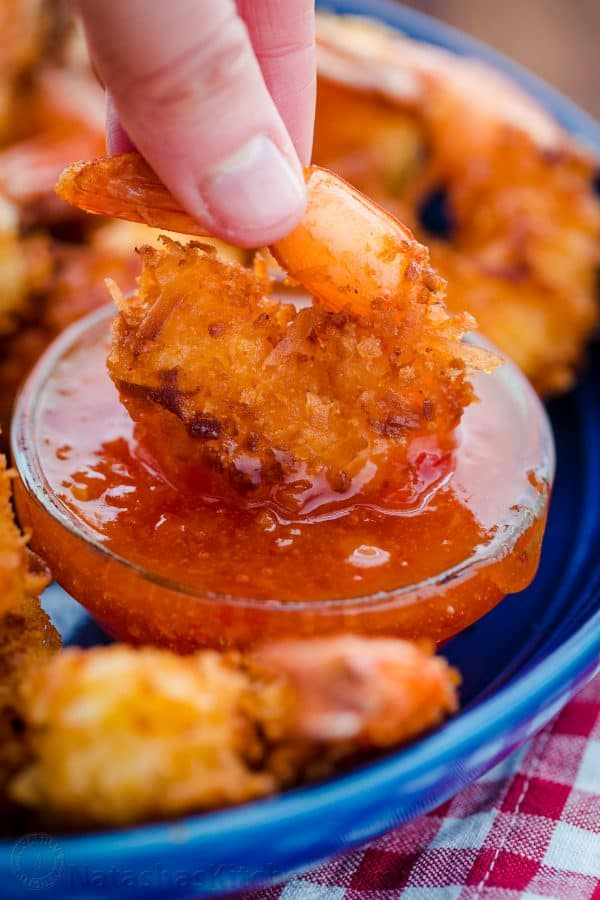
Coconut Shrimp are crisp on the outside with succulent juicy shrimp inside. Do not skip the simple (2 ingredient) coconut shrimp sauce and the fresh squeeze of lime juice.
We love shrimp recipes around here, like shrimp scampi, creamy shrimp pasta, or shrimp fried rice, and even shrimp cakes. This coconut shrimp recipe does not disappoint!

This post may contain affiliate links. Read my disclosure policy.
The Best Coconut Shrimp!
This coconut shrimp recipe reminds me of the gorgeous restaurant coconut shrimp we ordered in Maui and I’m telling you this recipe rivals those but it’s way less expensive to make a batch of homemade coconut shrimp. They taste like vacation, especially when paired with that amazing apricot sweet chili dipping sauce.
I can’t say enough about the dipping sauce – it’s ridiculously good! Also, check out the make-ahead options below to turn these into your new favorite party appetizer.
What Size Shrimp for Coconut Shrimp?
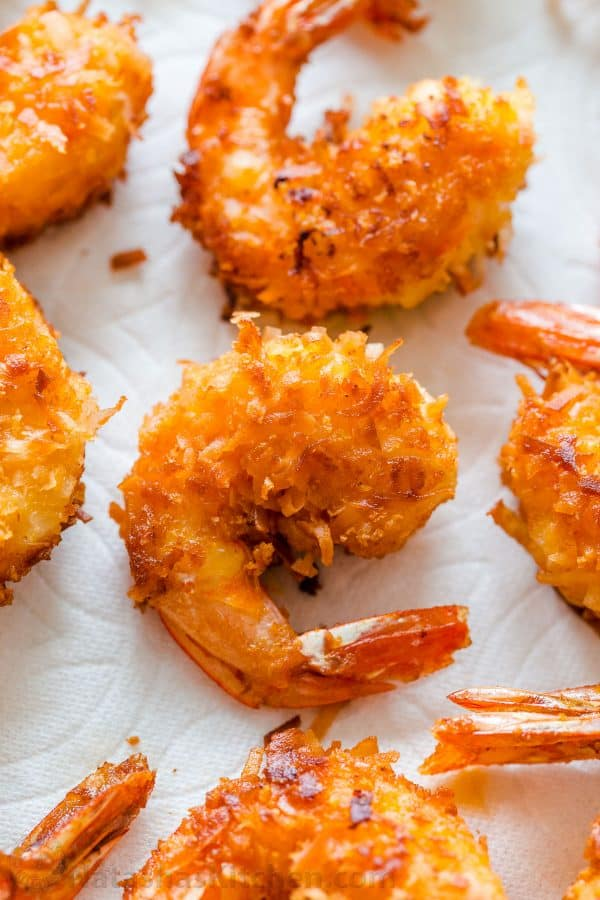
We used 1 pound of large 21-25 count shrimp. We found this to be the ideal size for coconut shrimp to get them perfectly cooked in the center and golden on the outside. Smaller shrimp overcook quickly and larger shrimp tend to burn before the center cooks through.
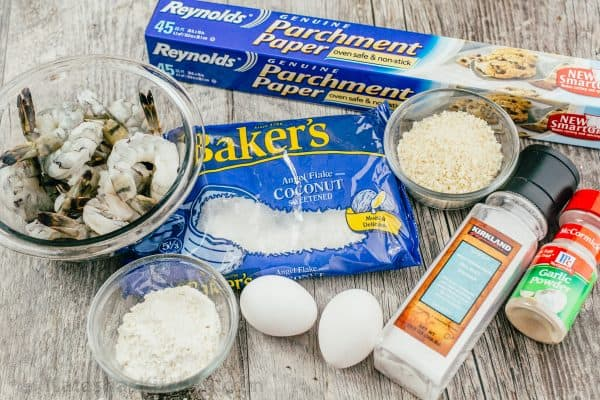
We use shrimp peeled and deveined with tails left on. The tails are optional but they make it easier to bread the shrimp and is a natural handle for eating the shrimp.
Which Coconut Flakes are Best?
We use Baker’s brand “Angel flake” sweetened coconut flakes. Using a sweetened coconut gives the shrimp more pronounced tropical flavor. You can find sweetened coconut flakes in the baking isle of most grocery stores.
Can I Make Air Fryer Coconut Shrimp?
Yes! If you prefer not to fry the shrimp, the air fryer is next best option – it quickly crisps up the exterior, keeping the center plump and juicy. Generously spray both sides of the breaded shrimp with cooking spray then cook air fryer shrimp at 400˚F for 8 minutes total, flipping the shrimp halfway through.
How to Make Baked Coconut Shrimp:
In all of our tests, deep frying and air frying produced the best results. Baking coconut shrimp in a conventional oven was our least favorite cooking method because it takes longer and the breading doesn’t crisp up quite as well. To bake in a regular oven, generously spray both sides of the shrimp with cooking spray and bake at 400˚F for 15 to 20 minutes, flipping shrimp halfway through.
Ingredients for Shrimp Dipping Sauce:
All you need to make an amazing coconut shrimp sauce is equal parts of sweet chili sauce and apricot preserves or apricot fruit spread. Simply stir to combine.
The sweet chili sauce can be found in the Asian food section of the grocery store. If your apricot preserves have large pieces of fruit, you will want to blend the sauce in a food processor or blender for easier dipping. In case you’re wondering, this sauce is NOT spicy.

How to Make Coconut Shrimp:
Making these is easier than you think. It’s a quick assembly line process, in which my 9-year old son is now a pro because we love coconut shrimp around here!
1. Set up 3 shallow bowls. In the first, stir together flour, garlic powder and salt. In the second, thoroughly beat together 2 eggs with a fork. In the third, combine coconut flakes and bread crumbs.
2. Dredge shrimp in flour, dip in beaten eggs then roll in coconut mixture, pressing it onto the shrimp to adhere well.
3. Once shrimp are all breaded, sautee or air fry right away, or refrigerate to sautee later.

Serve the shrimp right away – warm and crisp. I love to squeeze fresh lime juice over the top just before serving or serve with lime wedges and of course that amazing sauce.

This is a Make-Ahead Appetizer:
Option 1: Place raw battered shrimp on platter, cover and refrigerate up to 4 hours then sauté or air fry.
Option 2: Refrigerate cooked shrimp up to 2 days. Arrange on a baking sheet and bake in a standard oven at 400˚F for 8-10 minutes or until hot and crisp.


Comments
Post a Comment