
Prime rib can go two ways. The first is a pale, overcooked slice of roast beef. The grey meat is tasteless - covering it in mashed potatoes and gravy is the only way to justify consuming it. The second is a rosy pink and juicy slice of perfection. The salty crust gives way to a tender medium rare ribeye, enjoyed next to a dirty gin martini with blue cheese olives. Our goal is the latter.
Choose the Right Roast:
Finding a roast with great marbling is critical. If buying a whole sub primal, sort through the options at your supermarket. Look through the plastic on both ends, you’ll find that the difference in marbling varies greatly. If you can’t find a suitable roast, take a look at the strip loins. A well marbled strip beats a lean rib roast any day of the week – you can use this same process!
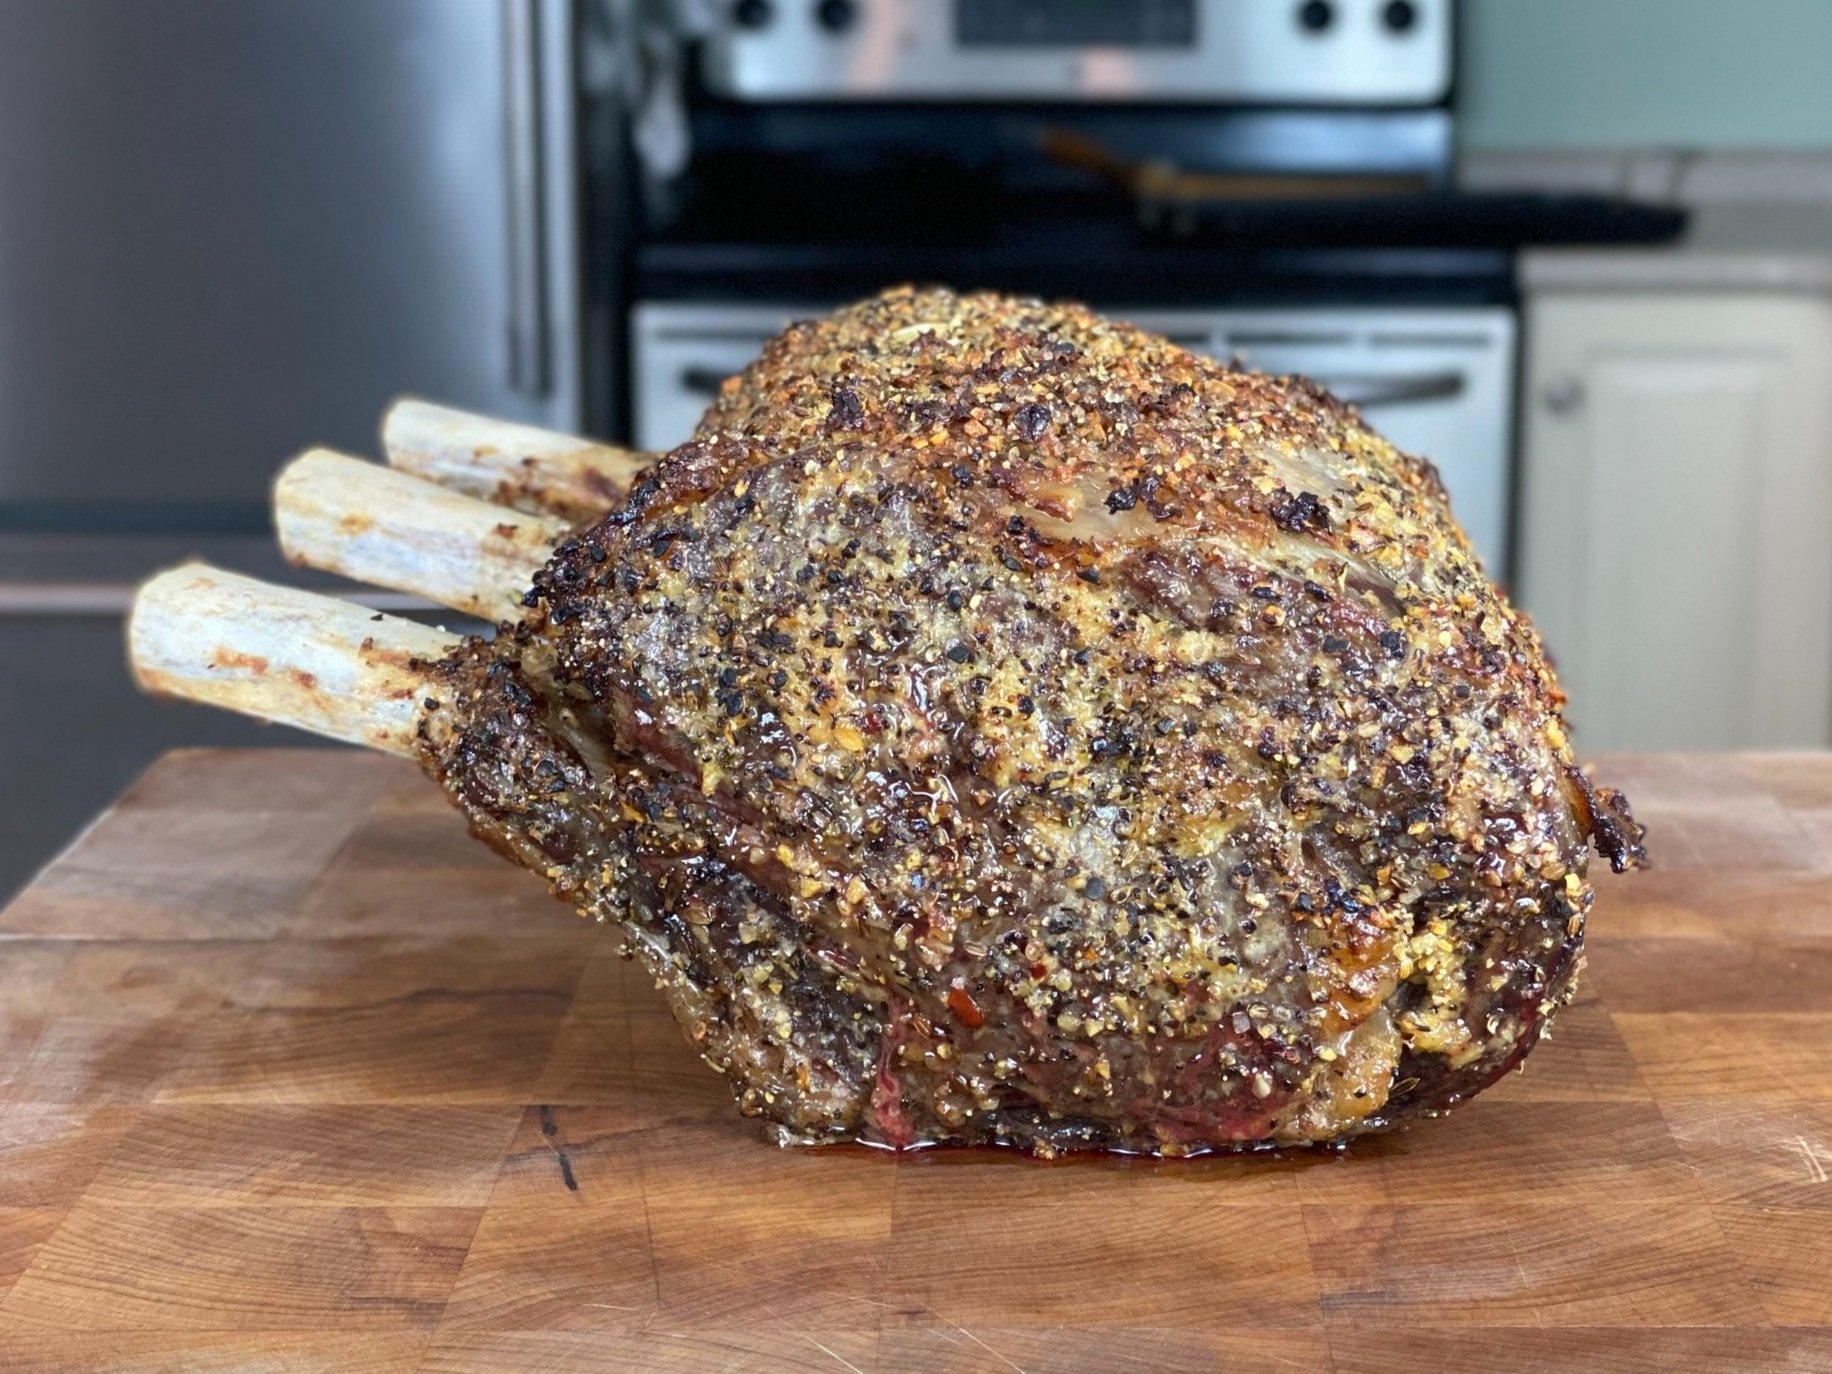
The Crust:
The difficulty with prime rib comes down to surface area. The crust to meat ratio is extremely low, especially when compared to a normal steak. Only a small amount of crust is enjoyed in each bite, and the center can be lacking in flavor. Last year around this time, I developed a recipe to fix that, check these out if you are feeling ambitious Prime Rib with Blue Cheese and Bacon and Prime Rib Experiment. This year was more traditional. However, I focused on maximizing the limited surface area by developing the thickest and most flavorful crust possible.
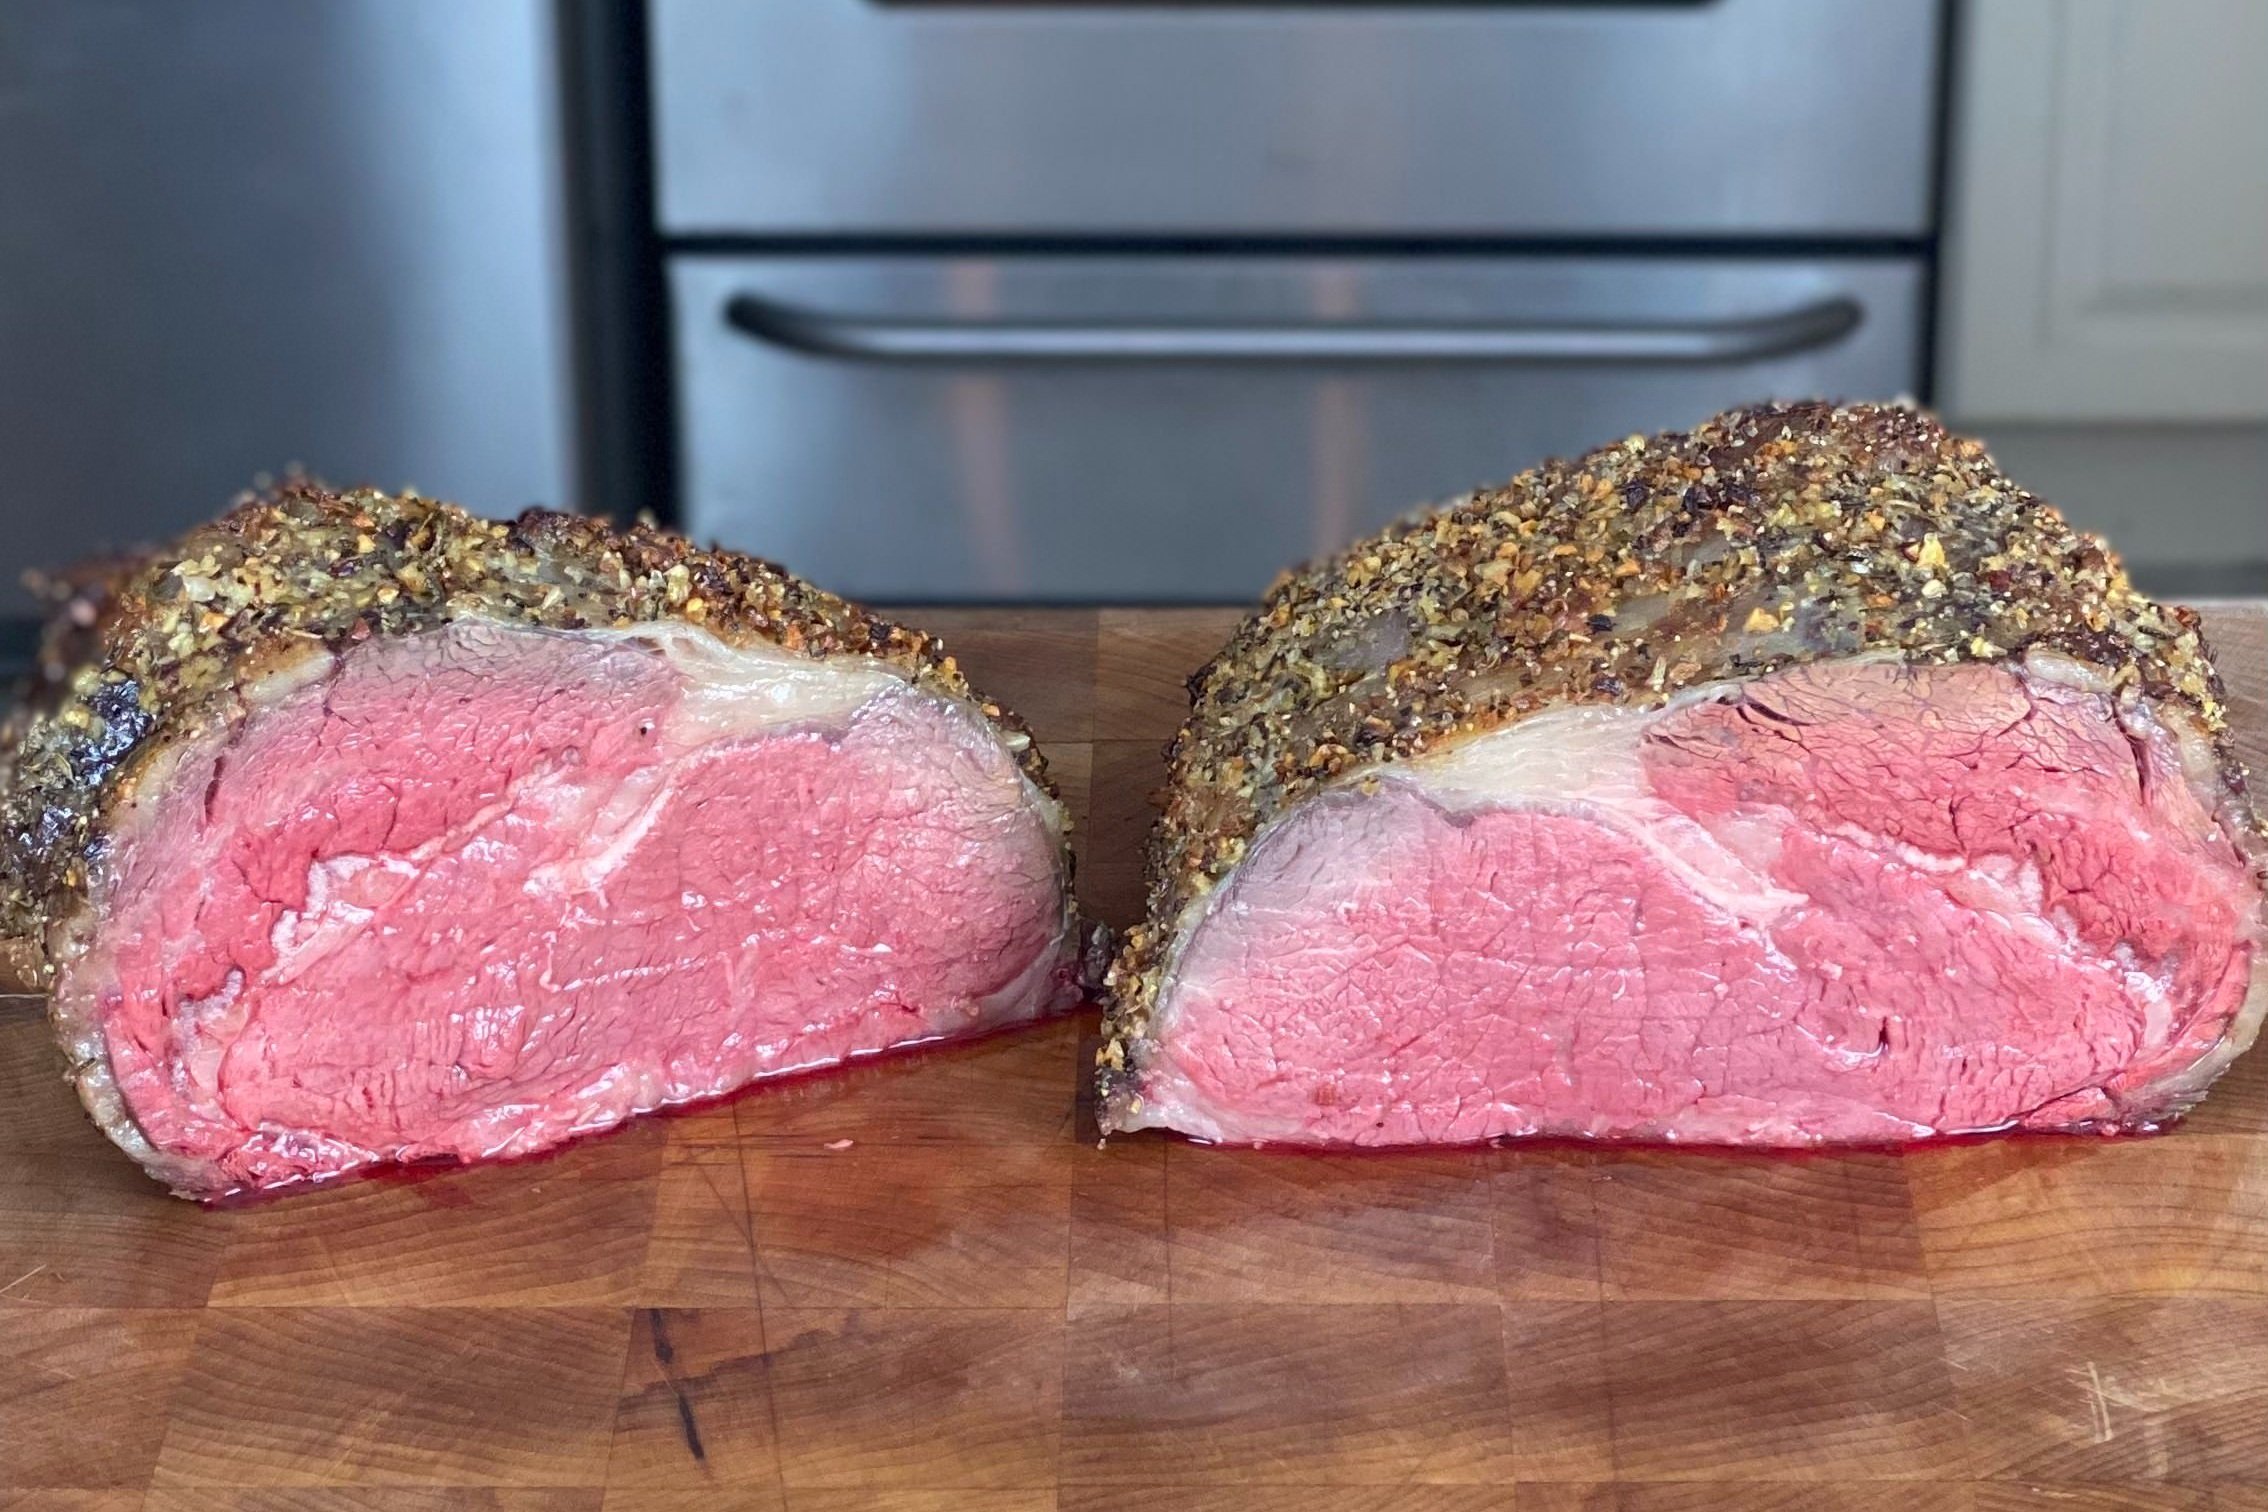
Edge to Edge Medium Rare:
Another critical issue with prime rib is the dreaded grey band. The direct center might be medium rare, but the edges are grey and overcooked. Many recipes call for roasting at a relatively high temp (350F+), or even worse, starting at an extremely high temperature and allowing the temp to slowly come down. Reverse searing (FIRST starting in a low temperature environment and THEN searing) is how we prevent this. Starting in a low temp oven or smoker (~225F) allows our roast to evenly come up to temp. After a 30-minute rest, we then finish with a sear.
Compound Butter:
Compound butter is a great addition to any steak. By covering the roast prior to cooking, all of the ingredients will cook into the beef forming an initial layer of flavor. Notice that this compound butter recipe does not have a salt component, our roast is already dry brined and subsequent salty ingredients will be added towards the end. Don’t forget to strain drippings after the cooking process, the beefy herb butter is great for dipping.


Bone-in or Boneless?
I’m a firm believer that cooking bone-in steaks are always worth it (I just find it way more fun). That said, feel free to use a boneless roast – the cooking process won’t change. If you go bone-in, consider removing the bones first OR slicing them mostly off (still leaving them attached). This will make carving easier at the end of the process and allow you to season all sides of the roast before tying the bones back on.

Dry Brine your Roast:
Dry brining involves salting the day before cooking, leaving it uncovered in the fridge. This dries out the exterior for a better crust – and most importantly in this case, seasons the meat deeply. Due to the surface area issue mentioned above, this is a great way to avoid a bland interior. It also prevents the crust from becoming too salty since the initial round of salt has a chance to absorb beyond that level.
INGREDIENTS
3 bone rib roast
Kosher salt
Montreal steak seasoning
Horseradish sauce
Compound Butter
2 sticks of unsalted butter
1.5T chopped garlic cloves
1.5T chopped shallots
Several sprigs of rosemary, chopped
Several sprigs of thyme, chopped
1.5t ground pepper
Horseradish Paste
1T dijon mustard
1T prepared horseradish
1T mayonnaise
1T worcestershire sauce
Full Recipe:
COOKING INSTRUCTIONS
Serves ~5-7
Prepare the roast: If bone-in, French bones (optional) and either fully or partially separate the bones from the roast.
Dry brine: Sprinkle kosher salt on all sides including bones. Using butchers twine, tie bones back onto roast. Set in fridge uncovered overnight, up to 2 days.
Prepare the compound butter: Combine the unsalted butter, shallots, rosemary, thyme, pepper and mix. Cover all sides of roast in a thick layer of the compound butter (makes enough for a 3-bone roast).
Prepare the horseradish sauce: Recipe here and set in fridge.
Place the roast in a 225F oven until an internal temp of 123F degrees internal for medium rare. Remove and let rest loosely covered at room temperature for 30 minutes.
Prepare the horseradish paste: mix the dijon, prepared horseradish, mayonnaise and worcestershire sauce in a bowl. Paint all sides of roast as it is resting.
Add a thin layer of montreal steak seasoning to all sides of the roast
Bring oven to 550F, place roast back in oven to sear for ~10 minutes once rested.
Remove once desired crust is achieved, slice off bones, and carve.
Strain the drippings from the pan into a bowl.
Serve with the horseradish sauce and drippings sauce. Enjoy!

Comments
Post a Comment