
Hands down, best way to ever make turkey! Wish I knew about this technique sooner!

Hands down, best way to ever make turkey! Wish I knew about this technique sooner!


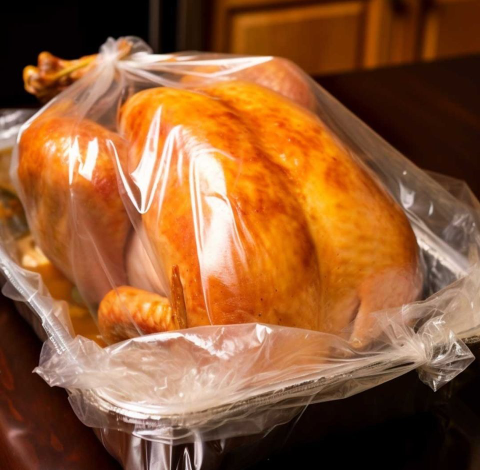
Planning a holiday feast? Elevate your celebration with a perfectly roasted turkey cooked in a plastic bag. This method promises juicy and flavorful results, making it a centerpiece that steals the show. Read on for a step-by-step guide and expert tips.

Ingredients:

QUANTITY INGREDIENT
1 whole turkey (12-24 pounds), fully thawed
1 oven-safe plastic bag
2/3 cup butter, softened
Salt and pepper
2 tablespoons dried herbs (thyme, rosemary, sage blend)
4 minced garlic cloves
1 white onion, roughly chopped
3 celery stalks, chopped
2 carrots, roughly chopped
1 tablespoon flour

Pro Tip: Allow one day of thawing in the fridge for every 5 pounds of your turkey.

Instructions:

  1. Thaw the Turkey:
    • Ensure your turkey is fully thawed in the refrigerator, allowing one day for every 5 pounds.
  2. Prepare the Herbed Butter:
    • In a bowl, combine softened butter, minced garlic, and the dried herb blend (thyme, rosemary, sage). Season with salt and pepper to taste.
  3. Prep the Turkey:
    • Remove the neck and giblets from the turkey.
    • Secure the wings by tucking them under.
    • Massage the herbed butter mixture all over the turkey, ensuring an even coating.
  4. Prepare the Bag:
    • Dust the inside of the oven-safe plastic bag with flour to prevent sticking.
  5. Assemble in the Bag:
    • Place the herbed and buttered turkey into the prepared bag.
    • Add the chopped onion, celery, and carrots to the bag.
  6. Seal the Bag:
    • Seal the plastic bag, ensuring it’s airtight.
    • Pierce a few slits in the bag to allow steam to escape during cooking.
  7. Set Up for Roasting:
    • Preheat the oven to 350°F.
    • Adjust the oven rack to just below the center.
  8. Roasting Time:
    • Roast the turkey based on its size:
      • 12-15 lbs: 2-2.5 hours
      • 15-20 lbs: 2.5-3 hours
      • 20-24 lbs: 3-3.5 hours
    • Cook until the internal temperature reaches 165°F.
  9. Rest and Serve:
    • Allow the turkey to rest for 20 minutes after cooking.
    • Carefully remove it from the bag and place it on a serving platter.
  10. Enjoy:
    • Indulge in the rich flavors of this specially roasted turkey, making it the centerpiece of a joyful holiday gathering.

Comments

  1. I only thing I don't like is that u don't get the same juices as traditional baking

    ReplyDelete
  2. Can you stuff it and cook it in the bag?

    ReplyDelete

Post a Comment

Popular posts from this blog

Pechugas de pollo rellenas de arándanos y espinacas con queso brie

Pechugas de pollo rellenas de arándanos y espinacas con queso brie Ingredientes: 4 pechugas de pollo deshuesadas y sin piel Sal y pimienta al gusto 4 oz de queso brie, en rodajas 1 taza de espinacas frescas, salteadas 1/2 taza de arándanos rojos secos 1 cucharada de aceite de oliva Romero fresco, para decorar Opcional: arándanos rojos frescos para decorar Instrucciones: Prepara las pechugas de pollo: Precalienta el horno a 375 °F (190 °C). Corta con cuidado cada pechuga de pollo en forma horizontal para crear un  bolsillo. Sazona ambos lados con sal y pimienta. Rellena el pollo: Rellena cada bolsillo con rodajas de brie, espinacas salteadas y un puñado de  arándanos rojos secos. Usa palillos para asegurar si es necesario. Dorar y  hornear: En una sartén apta para horno, calentar el aceite de oliva a fuego medio. Dorar  cada pechuga de pollo rellena durante 2-3 minutos por lado hasta que se dore. Transferir la sartén al horno y hornear durante 15-20 minutos, o hast...

Pan Casero en Licuadora: ¡La Receta que Siempre Sale Bien!

Pan Casero en Licuadora: ¡La Receta que Siempre Sale Bien! ¿Te gustaría preparar un pan casero sin amasar y sin complicaciones? Esta receta es ideal para ti: fácil, rápida y con un resultado espectacular. Un pan suave, dorado y lleno de amor, perfecto para compartir en familia o disfrutar con tu café de la tarde. ¡Anímate a probar esta delicia hecha en casa! Ingredientes: 2 tazas de leche tibia 1/2 taza de aceite 2 huevos 1 cucharadita de sal 2 cucharadas de azúcar 1 sobre (10g) de levadura seca (biológica) 4 tazas de harina de trigo Modo de Preparación: Coloca en la licuadora la leche tibia, el aceite, los huevos, la sal, el azúcar y la levadura. Licúa durante 2 minutos hasta que todo esté bien mezclado. Pasa la mezcla a un bol amplio y añade la harina poco a poco, removiendo hasta obtener una masa densa pero manejable. Engrasa moldes para pan y llena hasta la mitad para permitir que la masa leve correctamente. Cubre con un paño limpio y deja reposar en un lugar cálido ...

Masa filo en capas con queso brie, salsa de arándanos y nueces

Masa filo en capas con queso brie, salsa de arándanos y nueces  Ingredientes: 12 láminas de masa filo, descongeladas 8 oz (225 g) de queso brie, en rodajas finas ½ taza de salsa de arándanos (casera o comprada) ½ taza de nueces tostadas picadas gruesas 3 cucharadas de miel (más extra para rociar) 4 cucharadas de mantequilla derretida (para pincelar la masa filo) Tomillo fresco (opcional, para decorar) Instrucciones: Precaliente el horno: Precaliente el horno a 375 °F (190 °C) y cubra una bandeja  para hornear grande con papel pergamino. Prepara las capas de masa filo: Coloca una hoja de masa filo y úntala ligeramente con mantequilla derretida.  Coloca otra hoja encima y úntala con más mantequilla. Repite hasta que tengas  una pila de 6 hojas. Corta la pila en rectángulos (de unos 10 x 10 cm) y colócalos en la bandeja para  hornear preparada. Repite con las hojas de masa filo restantes para crear más  capas. Hornea la masa filo: Hornea los rectángulos de ...